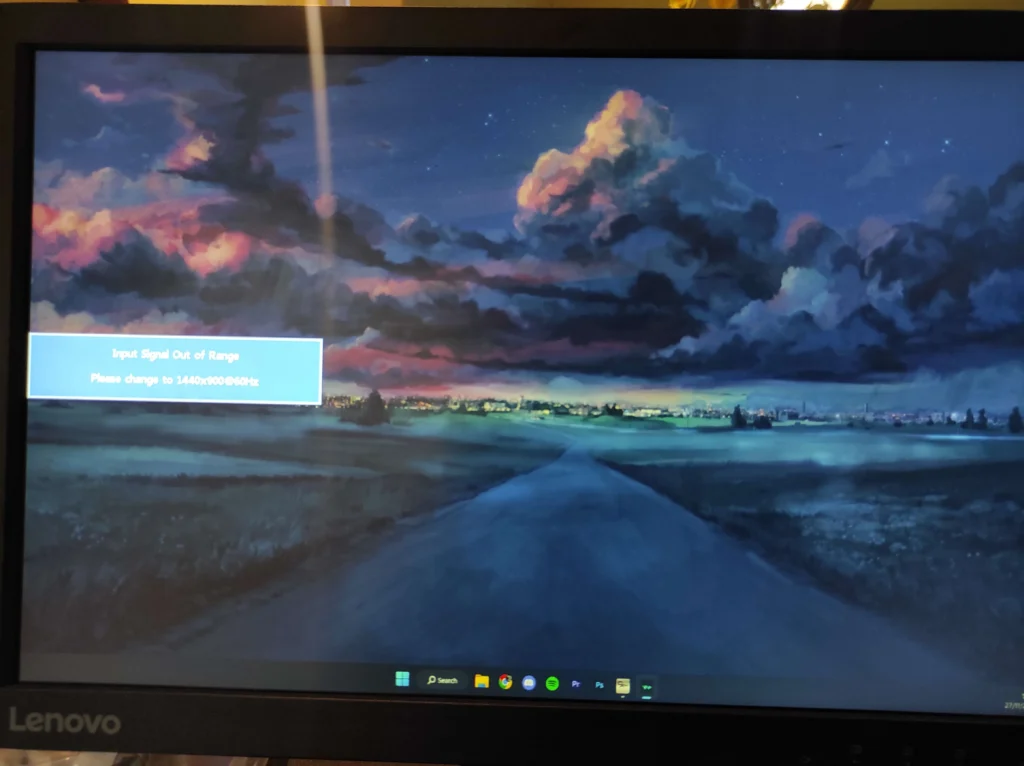
Encountering a black screen with a floating error message can be a deeply unsettling experience, especially when you are in the middle of critical work or a cherished digital project. You power on your system, the fans whir to life, the lights on the keyboard glow, but instead of your familiar desktop, the HP monitor remains dark except for a vibrant, bouncing dialog box. It reads: Input Signal Out of Range Monitor HP. This message, often accompanied by technical figures detailing horizontal and vertical refresh rates, creates a wall between you and your data. It is a signal of a fundamental communication breakdown between your computer’s graphics processing unit and your display device. While the screen may seem stubbornly locked, this issue is rarely a sign of catastrophic hardware death. It is almost always a resolvable configuration mismatch. This guide will walk you through a methodical, step-by-step restoration process, designed to bridge the gap between your system’s output and your monitor’s capabilities without venturing into unsafe digital territories or harmful software practices.
The error essentially translates to a negotiation failure. Your computer is sending a video signal, but the format, resolution, or refresh rate of that signal is a language your HP monitor cannot understand. The monitor is not broken; it is simply protecting itself by refusing to display a signal that exceeds its specifications. Think of it like trying to tune a radio to a frequency that doesn’t exist; all you get is static, or in this digital case, a protective warning. The solutions involve accessing the root of this miscommunication, often hidden behind the very screen that is refusing to cooperate. We will explore pathways to restore harmony, from simple hardware checks to deeper software configurations using low-resolution modes. Our goal is to regain visual clarity and establish a stable, permanent connection that respects both your hardware’s power and its limitations.
Understanding the Silent Dialogue Between Your Computer and HP Screen
Before diving into the recovery steps, it is beneficial to grasp the invisible conversation that occurs every time you power on your setup. This knowledge transforms a cryptic error message into a logical, solvable problem. When your computer boots, its graphics card performs a handshake with the attached monitor through the connected cable. This handshake involves sharing a list of supported display modes called Extended Display Identification Data (EDID). The computer reads this data and then typically outputs a signal that matches the monitor’s native, or optimal, configuration. However, when this automatic negotiation fails—often due to a software update, a new game applying aggressive settings, or a swapped graphics adapter—the computer may default to a generic, high-resolution signal that the monitor’s circuits simply cannot process.
Decoding the Floating Warning Box
The Input Signal Out of Range Monitor HP message is a clear, self-contained error system. It is generated not by your computer’s operating system, but by the monitor’s internal firmware. The message often displays specific numerical values, such as a recommended resolution and refresh rate alongside the current out-of-range setting. For instance, it might indicate “Current: 1280×1024 @ 85Hz / Recommended: 1920×1080 @ 60Hz.” The logic is straightforward. The first value is the problematic signal the monitor is receiving. The second value is the monitor’s safe operating zone. The core of the problem is the mismatch between these two sets of numbers. The frequency, measured in Hertz, is a particularly sensitive parameter. While modern LCD and LED displays are more flexible than the old bulky CRT monitors, they still have strict electronic limits. Sending a vertical refresh rate that is too high or too low forces the monitor’s timing controller into a state of confusion, triggering the protective error message.
Initial Diagnostic Steps: Ruling Out Physical Interference
The most sophisticated software repair can be completely ineffective if the root cause is a simple physical disconnect. A methodical approach always begins with the tangible components. Your monitor cable is the first and most common point of failure. It carries a complex, high-speed digital stream, and any compromise in its integrity can corrupt the signal just enough to make it unreadable.
The Critical Role of a Secure Cable Connection
First, completely power down your computer and monitor. Do not just put them to sleep; perform a full shutdown. Unplug the power cables from the wall outlet and wait for sixty seconds. This discharge cycle, often called a power drain, resets the internal capacitors in both devices and forces a fresh EDID handshake upon reboot. While the power is disconnected, inspect the video cable. Whether you are using an HDMI, DisplayPort, DVI, or a legacy VGA connector, ensure both ends are seated with a firm and flush connection. A connector that looks attached but is tilted by even a millimeter can cause signal degradation. Disconnect and reconnect the cable at both the computer and the monitor ends, feeling for a positive click or lock.
Examine the cable itself for damage. Look for sharp kinks, heavy furniture pinching the cable, or frayed ends. A damaged internal wire can still carry a partial signal—enough for the monitor to detect an input, but too corrupted to synchronize, thus triggering the Input Signal Out of Range Monitor HP error. If you have access to a different, verified working cable, swapping it out is one of the most efficient diagnostic tests you can perform. A faulty cable can masquerade as a broken graphics driver, leading you down a long path of unnecessary software troubleshooting.
Examining Ports and Electrical Resets
The physical ports on your graphics card and monitor should also be inspected with a flashlight. Look for bent pins, especially in DVI or VGA ports, or debris obstructing a connection. Dust can be gently blown out with a can of compressed air. While the power cords are unplugged, press and hold the power button on both your computer and your HP monitor for about 10 to 15 seconds. This manual drain removes any residual charge from the circuits. When you plug everything back in and power up the monitor first, followed by the computer, you are creating the ideal conditions for a clean, unambiguous communication sequence. Often, this single act of performing a full power cycle and reseating cables will cause the graphics driver to re-read the monitor’s EDID chip correctly, instantly banishing the floating error box.
Booting Into a Safe Visual State: The Key to Regaining Control
When the error message persists and you are locked out of your desktop, you cannot open a settings menu to change the resolution. You are caught in a frustrating loop. The solution is to force your operating system to start with a minimal, universally accepted display standard. This safe mode bypasses your custom, out-of-range settings and loads a basic video driver with a low resolution and a standard refresh rate, typically 60Hz. This guaranteed-to-work visual state is your gateway to fixing the problem.
Navigating to Low-Resolution Mode on a Blank Canvas
To access this diagnostic environment, you will need to interrupt the normal boot process. Begin with your computer completely shut down. If the computer is currently on and stuck on the error screen, perform a hard shutdown by holding the physical power button for a full ten seconds until all lights and fans turn off. Once the system is off, press the power button and immediately begin tapping the designated interrupt key. This key varies by computer manufacturer but is commonly the F8 key on many systems, or Shift + F8. On modern Windows systems, a more reliable method is to forcefully interrupt the boot sequence three times in a row. Power on, and as soon as you see the manufacturer’s logo or the spinning circle, hold the power button to shut down again. Repeat this three times. On the fourth boot, you will be greeted by the “Automatic Repair” screen. From here, navigate to “Advanced options” -> “Troubleshoot” -> “Advanced options” -> “Startup Settings” and then click “Restart.” After the restart, you will see a numbered list. Select option 3 or F3 to “Enable low-resolution video.”
Your screen will flicker to life, displaying a large, grainy desktop. The colors may look basic, and the icons will be oversized, but the critical victory is that the Input Signal Out of Range Monitor HP message is gone. You have successfully taken control. In this mode, your system is speaking a universal visual language that any screen can comprehend. The damage is not permanent; your high-resolution wallpaper and custom settings are all preserved. You are simply operating under a temporary, safe visual umbrella that allows you to perform the corrective surgery on your display settings. From this position of visual stability, you can now proceed to the software adjustments that will establish a lasting peace between your graphics driver and your monitor.
Restoring Harmony: Methodical Software Adjustments
With your desktop now visible in low-resolution mode, the path to a permanent fix lies within your system’s display settings. The goal is not just to change the resolution, but to methodically clean out any conflicting configurations that caused the original mismatch. This process involves resetting your display driver settings and carefully selecting a mode that sits comfortably within your HP monitor’s certified range. It is a deliberate act of re-establishing the broken digital handshake.
The Crucial Reset of Graphics Driver Parameters
The first and most effective action in this safe environment is to uninstall the current graphics driver and its associated settings software. A simple change of resolution from a normal boot might be overwritten if a hidden profile is forcing the out-of-range value. While in low-resolution mode, right-click on the Start button and select “Device Manager.” Expand the category labeled “Display adapters.” You will likely see the name of your graphics card—NVIDIA, AMD, or Intel. Right-click on it and select “Uninstall device.” In the confirmation dialog box that appears, check the small box that says “Attempt to remove the driver software for this device” and then click Uninstall. Your screen may flicker or turn black momentarily and then return in an even more basic state. Do not be alarmed. You have just removed the complex instructions that were causing the conflict.
Next, you must remove the control panel applications that can secretly re-apply aggressive settings. Navigate to “Settings” > “Apps” > “Installed apps.” Search for your graphics control panel, such as “NVIDIA Control Panel” or “AMD Software: Adrenalin Edition,” and uninstall it. This step is vital because these applications often have startup profiles that can force an overclocked refresh rate or a custom resolution on boot, instantly re-triggering the Input Signal Out of Range Monitor HP error before you have a chance to see the desktop. Once these are removed, restart your system. Allow Windows to boot normally, without forcing safe mode. The operating system will automatically detect the graphics hardware and install a stable, generic, Microsoft-approved driver. This clean-slate driver will communicate with your monitor using only the safest, most compatible settings, almost certainly resolving the out-of-range message immediately.
Manually Defining a Safe and Compatible Resolution
After the clean boot with the new generic driver, your display should be working flawlessly, albeit potentially not at its maximum possible resolution. The final, delicate task is to set a permanent, high-quality display mode that your HP monitor officially supports. Right-click on a blank area of your new, stable desktop and select “Display settings.” Scroll down until you find the “Display resolution” section. You will see a dropdown menu. It is absolutely essential that any entry you choose is marked with the word “(Recommended)” next to it. This designation indicates that the resolution is the monitor’s native setting, as read directly from its EDID chip. Selecting this setting ensures perfect pixel mapping and a standard 60Hz refresh rate.
After selecting the recommended resolution, you must verify the refresh rate, which is a hidden but critical part of the fix. Scroll down further and click on “Advanced display.” At the bottom, look for a blue link titled “Display adapter properties for Display 1” and click it. In the new small window, navigate to the “Monitor” tab. Here, you will find a “Screen refresh rate” dropdown. Ensure this is set to 60 Hertz. This is the universal safe zone for almost all modern HP flat-panel monitors. A setting of 59.997 Hz or 60 Hz is what you want. Save the changes by clicking “Apply” and then “OK.” Your screen will now be running in a mode that is both visually pristine and electronically safe. The floating error is now a thing of the past because you have manually rebuilt the connection on a foundation of certified, stable parameters.
Advanced Resets: Clearing the CMOS and Firmware
If the low-resolution boot and driver reset did not solve the problem, the conflict may be occurring at a lower level, before the operating system even loads. This indicates a deeper miscommunication within the motherboard’s BIOS or the monitor’s own internal processing unit. These advanced resets act as a master clear, wiping any persistent memory that could be forcing an incorrect video signal during the initial boot phase. These are safe, physical procedures that do not involve software hacks, but rather direct hardware resets.
The Motherboard’s Memory: A BIOS and CMOS Reset
The Basic Input/Output System (BIOS) or UEFI firmware on your motherboard is the first program that runs when you press the power button. It initializes your hardware and hands control over to Windows. If a corrupted setting is instructing the BIOS to output a display mode incompatible with your HP monitor, you will see the error message even before the Windows logo appears. The solution is to clear the CMOS, a small chip that stores the BIOS settings, returning them to factory defaults.
First, completely shut down and unplug your computer. Open the side panel of your case. Locate a shiny, silver coin-shaped battery on the motherboard. This is the CMOS battery. Gently press the small metal latch holding it in place, and the battery will pop out. Wait for five full minutes. This pause is critical; it allows every capacitor on the board to drain, ensuring a complete memory wipe. While the battery is out, press the computer’s case power button several times to drain any lingering charge. After five minutes, reinsert the battery with the positive side facing up, securely close your case, and plug the system back in. Power it on. The boot process will be slower than usual as the BIOS rebuilds its hardware list. It will now output the most generic, fail-safe video signal possible during startup, which any HP monitor can display. This process frequently resolves the Input Signal Out of Range Monitor HP error that stubbornly appears even in safe mode.
An Internal Reset for Your HP Monitor’s Processor
Just like the motherboard, your HP monitor has its own internal processor and firmware settings that can become confused. A lingering condition in the monitor’s non-volatile memory can cause it to reject a perfectly good signal. To clear this, you must perform a hard factory reset on the monitor itself, and this method is different from simply navigating the on-screen menu. Unplug the monitor’s power cable entirely. Disconnect the video cable from the back of the monitor, leaving it with no input connection whatsoever. Now, press and hold the monitor’s physical power button for a solid 30 to 60 seconds. You are manually discharging every capacitor on the power and logic boards. This deep power drain forces the monitor’s firmware to reboot from scratch, abandoning any corrupted EDID handshake data that was stored temporarily.
After holding the button, leave the monitor completely disconnected from power and any video source for another ten minutes. When the time has elapsed, reconnect only the power cable and turn the monitor on. You will likely see a “No Source Signal” or a self-test color screen floating around. This is a good sign. The monitor’s brain is alive and thinking clearly. Turn the monitor off, reconnect your video cable from the computer, and power the computer on. This complete, two-way factory reset—clearing the BIOS on the motherboard and the firmware in the monitor—re-establishes a fresh, zero-point handshake. It forces a clean re-negotiation of display parameters, and in this pristine state, the automatic detection almost always selects a safe, standard resolution and refresh rate, banishing the out-of-range message for good.
Long-Term Stability: Preventing the Error’s Return
After successfully navigating the troubleshooting maze and restoring your display, adopting a set of careful habits will prevent this stressful error from recurring. The Input Signal Out of Range Monitor HP message is often a self-inflicted wound, caused by a momentary lapse in caution when adjusting gaming or display settings. The final phase of this journey is about building a safe digital practice that respects the physical limits of your hardware.
The Danger of Unverified Custom Resolutions
The most common trigger for the out-of-range error is the creation or selection of a custom resolution and refresh rate. Advanced graphics control panels often feature a tempting section for custom settings. You might be looking to squeeze out a few more frames per second in a visually demanding application. However, creating a custom mode like 1920×1080 at 75Hz or 1440p on a screen panel designed only for 60Hz forces the monitor’s scaler chip to operate outside of its engineered tolerances. The monitor’s protective circuitry will instantly lock up to save itself from damage, displaying the floating error. Never create a custom resolution unless you have verified in the official product specifications document that your exact HP model supports that specific combination. The small, short-term performance gain is never worth the risk of losing visual access to your system.
Managing Application-Specific Configuration Files
Many programs, particularly digital creative suites and simulation software, can alter your desktop resolution automatically upon launch and fail to restore it correctly on exit. A game might crash, leaving your desktop stuck at a low or unsupported refresh rate that persists on the next reboot. To guard against this, always configure your applications to run in “Windowed Fullscreen” or “Borderless Windowed” mode instead of exclusive “Fullscreen.” This mode keeps the application’s resolution tied to your safe desktop resolution, preventing any sudden, unauthorized hardware mode switches. If you must use exclusive fullscreen mode, always ensure the in-game resolution is set to match your desktop’s recommended setting. Saving a game configuration file in the cloud with an out-of-range resolution can instantly re-trigger the problem on a fresh install. If you suspect a single program is the culprit, search online for its safe-mode launch options. For instance, many programs accept a -safe -w command that will force them to start in a small window, allowing you to reset their internal video settings to a compatible standard.
By treating your monitor’s recommended resolution and refresh rate as an inviolable law, you maintain a stable and healthy digital environment. The screen is a window to the vast digital world, and this window must be kept clear through mindful configuration. The solutions provided here are not mere quick fixes, but a comprehensive methodology for understanding and permanently resolving the silent conflict signaled by the Input Signal Out of Range Monitor HP warning. With your settings now properly aligned, your HP monitor will serve as a reliable, crystal-clear portal to your work and creativity for years to come.